

If you want to stream using a Windows or Mac desktop or laptop, we recommend the use of OBS Studio. This is free software and can be downloaded here on their website. OBS is a great third-party streaming software that works well with the MyVRSpot solution.
Connecting OBS to Your MyVRSpot Streaming Channel
To live stream using your MyVRSpot Channel and OBS, you’ll first need to connect OBS to your MyVRSpot streaming channel. To do this, follow these steps:
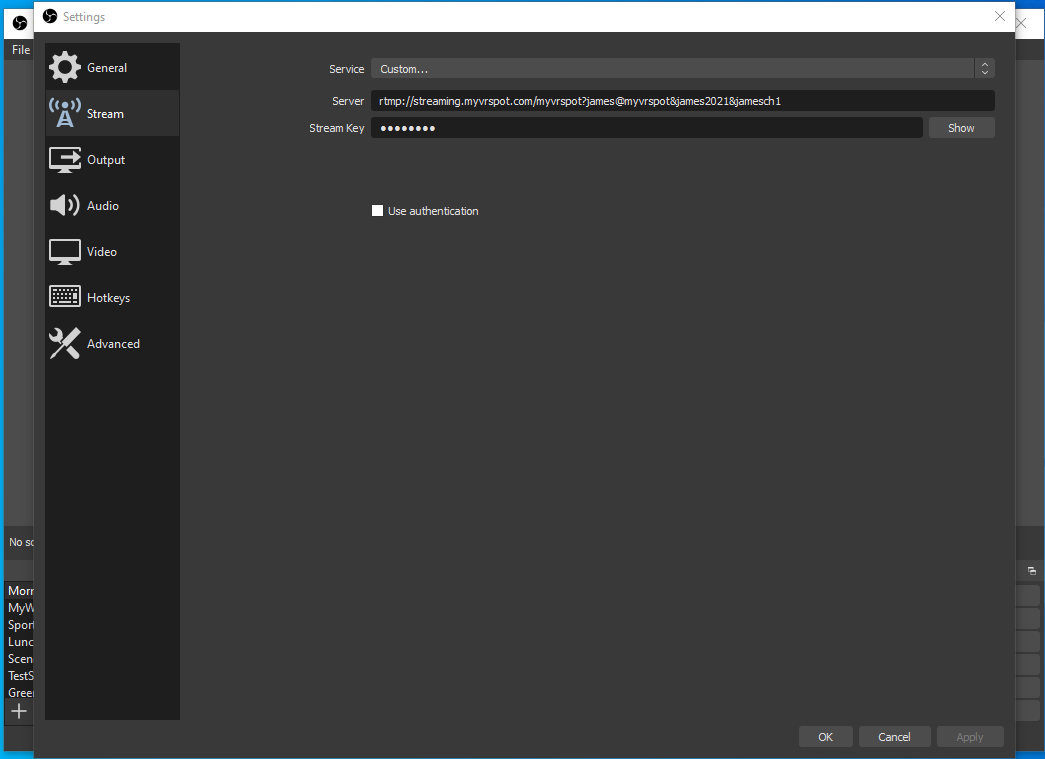
Step 1: In OBS, go to “Settings” and click “Stream” in the left side Menu, and select “Custom Live streaming server”.
Step 2: Login to your MyVRSpot account to get the information you need to stream, which is the RTMP address and the Channel ID. In your MyVRSpot account click Streaming > My Streaming Channels > the View (eye) icon of the Channel you’ll stream to. Copy and paste the RTMP address into the URL field in OBS and the Channel ID into the Stream key field in OBS.
Step 3: Replace “YOURPASSWORDHERE” in the RTMP address with the password you use to login to your MyVRSpot account or with the API Key you created and click OK.
Now do a test stream to make sure your broadcast looks and sounds the way you want. If it all works the way you’d hoped, you’re ready to go!
ALERT: While most of the OBS defaults work really well, we recommend changing the default Bitrate to 1,000 – 1,500kbps. This will eliminate your viewers experiencing any choppiness, freezing, or bitmapping while viewing your stream.
Click on the Output icon on the left hand side, and you will see Video Bitrate under the Streaming section. Use the up/down arrows to change the bitrate as noted above.
Streaming Troubleshooting
If your password doesn’t work, there may be a few things happen. Here are some troubleshooting items to try before reaching out to Support:
If your school district uses Google Authentication, ClassLink or another form of account authentication, then you will need to create a secondary password. You can find instructions on how to do that here.
Make sure to replace “YOURPASSWORDHERE” in the RTMP address with your actual password.
Make sure there are no extra spaces at the end of the RTMP address or Channel ID threads.
Check for uppercase and lowercase letters.
Does your account have permission to stream to the Channel?
Adding a Monitor and Window Capture to a Broadcast
If you want to broadcast what is on your computer screen, you can use either Display or Window Capture.
Display Capture will broadcast everything that is on our computer screen in a certain area, although the size of that area can be changed. Window Capture will allow you to broadcast the screen of a particular application (Skype, Word, PowerPoint, Internet Browsers, etc.) and only that.
To set up a Display Capture,
- Go to the “Sources” widget,
- Click on the “+” sign, and
- Select Display Capture.
- Name it and click “OK”.
Now you have the choice of whether you want the mouse cursor are captured or not, and set the opacity. You can select “Sub-Region” to create a smaller area of your monitor screen to capture.

For Window Capture,
- Go to the “Sources” widget,
- Click on the +” sign, and
- Select Window Capture.
- Name it and click “OK.”
Select from the drop down menu which application you want to Window Capture from.
Choose whether you want to capture the Entire Screen, or the Inner Screen. You can choose if the mouse cursor is captured or not, the opacity, and create a smaller sub-region if you want. Click “OK” when you’re done.
Adding Video Sources to Live Stream
One of the simplest and most important tasks with OBS is to add video sources to your stream. To add a video source, such as webcam or a camera connected via a capture card, follow these steps:
- Click on the “+” sign that is inside the “Sources” widget. This will list the many types of video sources you can use.

- Select “Video Capture Device” if you want to add a camera.
- Then you will be asked to name your video source and choose from an existing one or create a new one.

At this stage, you can also choose to flip the image vertically or horizontally, adjust the opacity, change the resolution, or set up a chroma key (green screen) effect. When you are done click “OK” and your video source will be added.
If there is blank space bordering your video feed, you may need to go to “Settings” and adjust the resolution of your broadcast to match the size of your video input.
If you’re using a video, it’s recommended that you change the video’s settings so you capture the entirety of the the video. You can follow the instructions on how to do that here: http://www.myvideospot.com/docs/article/restart-media-playback-in-obs/
Adding Images or Text to a Live Stream
To add images to your stream,
- Click the “Sources” widget,
- then click the “+” sign, and
- select “Image”.
This will give you the option to “browse” for the image you want to add, and adjust the opacity if you like.

Alternatively, you can add an image slide show and select several individual files, or an entire folder.
You can also add text in the same manner. You can use the menu settings to choose color, opacity, font, size, if you want the text to scroll or not, the scroll speed, and of course, your message text.
Arranging Multiple Video Sources (Positioning and Layering)
OBS allows broadcasters to create scenes with multiple inputs on the same screen. This allows you to create professional picture-in-picture broadcasts and bring in multiple guests/videos via different sources.
After adding a source, you can position it anywhere you like. To move a source, just click on it and resize it reposition it the way you want.

You can also do a right click on your video source to change the order of your video sources, rotate them, or even add filters.
If you want to re-arrange the layering of your sources, go to “Order” and then select “Move up”, “Move Down”, “Move to Top” or “Move to Bottom”. Whatever is on the top layer will cover the sources behind it, with the bottom layer at the back. This can also be done by simply dragging them to the desired order.
To remove anything that has been added in your OBS Studio software: a filter, a video source or an audio source, just click on the “eye” icon to mask it.